Thursday, June 28, 2012

Peach Crisp

Being born and raised in Georgia, it only makes sense that I love peaches, right? I grew up eating this peach crisp for special events. Whenever I'd come home from college my mom made sure to make it for me. I attempted to impress my boyfriend (now husband) and his roommates by making this for them. It didn't go so well the first time since I forgot to add the flour mixture (I was a novice baker back then). And what if a good friend has a sweet little baby? I make this!

Peach Crisp
serves 6-8

Ingredients
4 cups peaches (fresh or frozen)
3/4 cup sugar, divided (1/4 and 1/2)
1/2 tsp cinnamon
1 cup flour
1/2 cup butter (1 stick), softened

The How-To
Preheat the oven to 375.
In a medium sized bowl, toss together the peaches, 1/4 cup sugar, and the cinnamon. Place in a lightly greased 8x8 baking dish.

In another bowl, mix together the rest of the ingredients. You can either use your Kitchen-Aid or two knives to cut the butter into the flour and sugar mixture until crumbly. I let the butter sit out at room temperature for about 30-45 minutes before I used it. It made the cutting much easier.


Pour the mixture on top of the peaches. Bake for 35-45 minutes until the flour mix is a golden brown on top.


While everyone else was devouring dessert, I was snuggling up with this little guy.


Unfortunately he wasn't able to enjoy the peach crisp, but one day he will because his mama asked me for the recipe.

You can print of this delicious summer recipe here. And also check out where I like to share my recipes with others.

Enjoy!


Tuesday, June 26, 2012

Tried It, Liked It Tuesday: DIY Wood Painted American Flag

Here's a little DIY craft just in time for the 4th of July. You still have time to make this!


DIY Painted American Flag
adapted from Crafty Butt

Supplies:
  • 1 rectangular piece of wood (mine was about 8x11)
  • 50 star stickers
  • red, white, blue spray paint (I used acrylic paint for part, but recommend spray paint)
  • painters tape or masking tape
  • sand paper
  • tape measurer
  • pencil
  • primer spray paint (optional)
  • paint brush (if using acrylic paint)

The How-To:

Sand the wood to help the paint stick better. If you're using primer, then spray a coat onto the wood and let it dry. Spray 1-2 coats of white paint on the piece of wood.

After the paint has dried, figure out about how wide each stripe will be. For me, each stripe ended up being about 0.6 to 0.7 of an inch (8"divided by 13 stripes). I made little pencil marks along the side. I then taped off a square for the star section of the flag. One thing to be aware of is that there are 7 shorter stripes that line up with the square with the stars and 6 longer stripes below the square. Make sure you take this into account when figuring out the size of your box for the stars. Make sense? Just look at the flag and you'll see what I'm talking about.

Start placing the star stickers into the box. I did my best to line everything up, but I didn't care too much about perfection. I did 5 rows of 6 stars first. Then, I did 4 rows of 5 stars inbetween. The pictures below show you what I did.


Next, I used the blue paint and painted right over those stars. I really do think that spray paint would be better/easier here, in which case you'd want to make sure that you cover the section where you'll be painting the stripes. Make sure you let the paint dry completely. I didn't wait long enough and when I taped the stripes down, it tore up some of the blue paint. I had to go back and fix this and it was annoying.


All right, you're almost there! Now, tape off the stripes that you want to keep white. Don't forget to protect the blue square and stars, too. This took some fenagaling of the tape because my stripes and the tape size didn't match up, but again I wasn't going for perfection. I then used my paint brush to spread on the red paint.

You can either leave your flag as is, or make your flag a little more rustic. You can choose one or all of these options. First, you can take a tea bag that has been soaking in hot water and rub it all over the flag to give a faded yellow color. Pat it dry. You can also take a hammer and hit all over the wood to add some dents and knicks. Finally, you can sand the flag to give it a more distressed look. Just make sure the paint is completely dried before doing any of these options!


Happy 4th of July!!!

Tuesday, June 19, 2012

Tried It, Liked It Tuesday: Sweet Orange Vinagrette

Since I have about 50 million (slight exaggeration) things pinned on Pinterest, I'm going to make an effort to actually make some of these things! If I like it, I'll share it with you.
Here's the first "Tried It, Liked It Tuesday" post. It is a variation of an orange vinagrette that I used to accompany the beet salad I made (recipe also below).

Sweet Orange Vinagrette
adapted from Taste of Home

Ingredients


  • 1/2 cup canola oil (used olive oil instead)
  • 1/3 cup orange juice
  • 3 tablespoons white wine vinegar
  • 1 green onion, finely chopped (didn't use because I didn't have it)
  • 1 tablespoon lemon juice
  • 1 tablespoon Dijon mustard
  • 1/2 teaspoon salt
  • 1/8 teaspoon white pepper (I used black pepper)

  • Directions:
    Mix all ingredients together and whisk until well blended. Viola! It's seriously that easy and homemade dressings are always much tastier than store bought. This was the perfect flavor to drizzle on this tasty beet salad.

    Red Cabbage and Beet Salad

    Ingredients:
    • red cabbage, chopped
    • mixed lettuce in a bag
    • 3-5 steamed and peeled beets, sliced (bought mine at Trader Joe's)
    • sliced oranges
    • chopped pecans
    • crumbled feta

    Directions:

    Toss all ingredients together and drizzle with dressing of choice (possibly the sweet orange vinagrette??). Enjoy!


    Sunday, June 17, 2012

    Grilled Peaches

    Life does not get much better than summer in Chicago. It's the time of year when this beautiful city redeems herself for being so harsh during the winter. Matt and I try to spend as much time outside as possible. We also love to grill and thankfully we have a great outdoor space to do this.

    Last weekend, Matt wanted to try grilling some new things, one of these things being peaches. So, we came up with our own little recipe and, in my unbiased opinion, it was delicious!


    Grilled Peaches

    Ingredients:
    3-4 peaches, halved
    1 tbsp cinnamon
    1 tbsp honey
    crumbled feta

    The How-To:
    Slice the peaches in half (I quartered some, but I think I prefer halved).


    Sprinkle the cinnamon on top of the peaches.


    Grill the peaches for 2-3 minutes per side. Take off the grill.


    Drizzle with honey and top with crumbled feta.

    This was a great side to the bbq burger and grilled corn that we made as well. Try it out and let me know what you think!

    Click here to print off the recipe.

    Check out where I share my recipes and crafts!

    Wednesday, June 13, 2012

    Unbroken

    Has anyone else read this book? Unbroken by Laura Hillenbrand who also wrote Seabiscuit. It was seriously good. So, so good. It was a bit tough for me to read at times due to the graphic descriptions, but that's what brought the story to life. It's history. It's a true story. This stuff really happened. The story stirred up all of my emotions - sadness, anxiety, excitement, pride, sorrow, disgust, anger, awe, joy, frustration, love. The list could go on. The ending is what surprised me the most and was what made me love the book even more. I definitely recommend it and plan on reading it again one day.

    Here's the book description from Amazon:

    On a May afternoon in 1943, an Army Air Forces bomber crashed into the Pacific Ocean and disappeared, leaving only a spray of debris and a slick of oil, gasoline, and blood. Then, on the ocean surface, a face appeared. It was that of a young lieutenant, the plane’s bombardier, who was struggling to a life raft and pulling himself aboard. So began one of the most extraordinary odysseys of the Second World War.

    The lieutenant’s name was Louis Zamperini. In boyhood, he’d been a cunning and incorrigible delinquent, breaking into houses, brawling, and fleeing his home to ride the rails. As a teenager, he had channeled his defiance into running, discovering a prodigious talent that had carried him to the Berlin Olympics and within sight of the four-minute mile. But when war had come, the athlete had become an airman, embarking on a journey that led to his doomed flight, a tiny raft, and a drift into the unknown.

    Ahead of Zamperini lay thousands of miles of open ocean, leaping sharks, a foundering raft, thirst and starvation, enemy aircraft, and, beyond, a trial even greater. Driven to the limits of endurance, Zamperini would answer desperation with ingenuity; suffering with hope, resolve, and humor; brutality with rebellion. His fate, whether triumph or tragedy, would be suspended on the fraying wire of his will.

    In her long-awaited new book, Laura Hillenbrand writes with the same rich and vivid narrative voice she displayed in Seabiscuit. Telling an unforgettable story of a man’s journey into extremity, Unbroken is a testament to the resilience of the human mind, body, and spirit.

    If you're still trying to figure out a gift for your dad for Father's Day, this would be perfect. I bought a copy for both my dad and father-in-law.

    Has anyone read Seabiscuit? Thoughts? I'm always looking for a good book to read, especially during the summer months when I have a little more time on my hands.

    Tuesday, June 5, 2012

    Father's Day Gift: "Dad, I love you to pieces!"

    This sweet Father's Day project turned out so cute! I can't wait for the fathers of my students to get this gift. You still have time to make this with your class (if you're still in school like me) or with your kiddos for their dad. Here's what you need...

    Supplies:
    paper and markers for your kid(s) to make a sign
    camera
    plastic picture frame (The Dollar Store had a few different options, but if you're looking for 30 or so for a class, I ordered mine on Walmart.com)
    a puzzle (got mine from The Dollar Store)
    hot glue


    How To:
    I mean, this is pretty self explanatory, but just incase you're really sleepy or something here's what I did...

    Have your kids make a fun sign that says, "Daddy, I love you to pieces!" Make sure that they write big enough so that you can see the sign when the picture is printed off. Take a picture. Once you've got your photo in hand, place it in the frame.

    Carefully use the hot glue to place the pieces around the frame. Go back and add a couple more puzzle pieces to add dimension, texture, and fill in any gaps along the frame. One thing to make sure of - when you are gluing the puzzle pieces along the bottom part of the frame, make sure that they do not hang over. Otherwise, the frame will not stand up.


    Let me know how yours turns out or if you have any other Father's Day ideas. I'm always looking for cute crafts to do with my students!


    Monday, June 4, 2012

    Mexican Sangria

    Here's another lovely drink recipe from Pinterest. We enjoyed this refreshing Mexican sangria in the hot 90 degree weather on Memorial Day in Chicago. Not a bad way to spend the afternoon!

    Mexican Sangria
    adapted from Design Sponge

    Ingredients:
    1 bottle of red wine
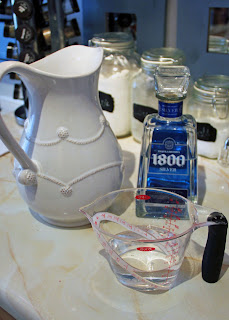
    1 cup of tequila
    1/2 cup of oj
    Sliced red or green apples, watermelon, oranges, mangoes, etc (whatever you want, really)

    In a large pitcher, mix the red wine through the fruit (in that order).


    photos courtesy of my husband

    Add ice to chill (if serving in the near future) OR cover and refrigerate overnight so the ingredients can all blend nicely together.

    Put a few ice cubes into each glass, pour the sangria, add some freshly chopped fruit, and enjoy on a hot, summer day!


    If you have any other tried and true versions of sangria recipes, please do share!

    Click here to see where I share my recipes and crafts.