Tuesday, July 31, 2012

Pizza on a pita

One of the things I love about living in a city is all of the diversity at my fingertips. Not too far from our place there's a bunch of small market stores that sell tons of produce from all over the world. I've never seen some of these fruits and veggies before. It's a cool experience and I've started to get to know several of the workers there. I love when I can make connections in a big city.

Now, I didn't use any of these weird veggies on the recipe I'm about to share with you, but I did find one of the main ingredients I needed at this little store. One of my girlfriends had mentioned to me that she's bought pitas at one of these stores before and used them for pizza crust. Great idea! So I tried out for the first time the other day.

I bought large, thin whole wheat pitas. I think there's about 10 in each packet. When I got home, I looked to see which ingredients I had that would taste good on a pizza. I ended up having a pepper and onion pizza with cheddar cheese on top. Yum!


Pita Pizza 

Ingredients:
2 pitas (just me and the husband)
5-6 tbsp tomato or marinara sauce
1 cup freshly grated cheese (cheddar, mozzarella would work well)
chopped onions
chopped peppers
seasoning to taste (salt, pepper, oregano, italian seasoning...you choose)

Directions:
Preheat oven to 375 degrees. Chop up your veggies. I chose to saute mine for a couple of minutes in olive oil. This is optional.


Next, take your pita bread and place it on a cookie sheet. I put tin foil underneath for easy clean up.


Spread on 2-3 tbsps per pita.


Sprinkle on the cheese, about 1/2 cup per pita. I also had sprinkled on some freshly chopped oregano before I added the cheese. 


Add the toppings.


And bake in the oven for 12-15 minutes or until cheese is melted and golden brown. Take out and let cool for 5 minutes.


I also think this would be great for families where each member gets to his pizza to his liking. I plan on doing this one day! Enjoy!

Click here to visit the other blogs where I'm sharing this tasty recipe!

Thursday, July 19, 2012

Ugly Rug Makeover

Since Matt and I spruced up our patio, I couldn't let this hideous doormat continue to look ugly while everything else was looking so nice. So, I chose a spray paint color I already had, used duct tape (you really can use this stuff for anything!) to make a striped pattern making sure that the paint would cover any stains or spots, and sprayed away.

Yikes.


This took several coats of spray paint. The rug appeared to just be absorbing all the paint, and there were even some spots that just wouldn't completely take in the paint. I was skeptical but when I pulled off the duct tape the end result was much better than I was anticipating.


This little rug still has its flaws, but its much better than before and it was a free makeover!

Wednesday, July 18, 2012

Pointsettia Pillow Giveaway Winner

Thanks to those of you who voted for your favorite pointsettia pillow. I think I know which one I'll be making the most of!

The winner of my little giveaway was Lisa Q. She'll be receiving a burlap pillow with a red pointsettia!


I'll make sure to let you know when these pillows are for sale in my Etsy shop, probably sometime in mid-late October.

Happy Wednesday!


Monday, July 16, 2012

World's Best Lasagna

This is one delicious lasagna recipe! Adding sausage in with the beef is what makes it extra special along with fresh parsley and basil from our garden. One of Matt's co-workers made this for us when we went to dinner at her place in March and ever since then I've been dreaming about it. It was SO good! I asked her to share the recipe with me and she said whenever she needs a recipe, she just googles "world's best _____________."

So, here it is. The world's best lasagna. Or at least the best in my own little world. It does require a little bit of prep, but it is well worth it and makes a ton of leftovers to be frozen or eaten later on in the week.


World's Best Lasagna
from Allrecipes

Ingredients
  • 1 pound sweet Italian sausage (I'll try it with a spicier sausage next time)
  • 3/4 pound lean ground beef
  • 1/2 cup minced onion
  • 2 cloves garlic, crushed
  • 1 (28 ounce) can crushed tomatoes
  • 2 (6 ounce) cans tomato paste
  • 2 (6.5 ounce) cans canned tomato sauce
  • 1/2 cup water
  • 2 tablespoons white sugar
  • 1 1/2 teaspoons dried basil leaves
  • 1/2 teaspoon fennel seeds
  • 1 teaspoon Italian seasoning
  • 1 tablespoon salt
  • 1/4 teaspoon ground black pepper
  • 4 tablespoons chopped fresh parsley
  • 12 lasagna noodles
  • 16 ounces ricotta cheese
  • 1 egg
  • 1/2 teaspoon salt
  • 3/4 pound mozzarella cheese, sliced
  • 3/4 cup grated Parmesan cheese


Directions

In a Dutch oven, cook sausage, ground beef, onion, and garlic over medium heat until well browned. Stir in crushed tomatoes, tomato paste, tomato sauce, and water. Season with sugar, basil, fennel seeds, Italian seasoning, 1 tablespoon salt, pepper, and 2 tablespoons parsley. Simmer, covered, for about 1 1/2 hours, stirring occasionally. 
Bring a large pot of lightly salted water to a boil. Cook lasagna noodles in boiling water for 8 to 10 minutes. Drain noodles, and rinse with cold water. In a mixing bowl, combine ricotta cheese with egg, remaining parsley, and 1/2 teaspoon salt.

Preheat oven to 375 degrees F (190 degrees C).

To assemble, spread 1 1/2 cups of meat sauce in the bottom of a 9x13 inch baking dish. Arrange 6 noodles lengthwise over meat sauce. Spread with one half of the ricotta cheese mixture. Top with a third of mozzarella cheese slices. Spoon 1 1/2 cups meat sauce over mozzarella, and sprinkle with 1/4 cup Parmesan cheese. Repeat layers, and top with remaining mozzarella and Parmesan cheese. Cover with foil: to prevent sticking, either spray foil with cooking spray, or make sure the foil does not touch the cheese.

Bake in preheated oven for 25 minutes. Remove foil, and bake an additional 25 minutes. Cool for 15 minutes before serving.


Friday, July 13, 2012

Christmas Pillow Survey/Giveaway!

That's right, Christmas. Since I have the summer months off, I'm maximizing my time by planning ahead. Last year, I made several of these pointsettia pillows for family and friends. I had no idea they'd be in such high demand (thanks guys!) and I had to turn down some people because there just simply wasn't enough time.

So, here I am planning ahead. But, I need your help. If you were to purchase one of these pillows from me, which would you be most likely to choose. Please let me know by leaving a comment below. Oh, and if you leave a comment voting on your favorite pillow by Tuesday, July 17, you've entered yourself to win one of these!

Here are the rules:
  • Leave a comment telling me which is the pillow of your choice.
  • Follow my blog....please? :) This will also help me get in touch with you if you win. Or just leave your email in the comment.
  • Check back on Wednesday morning to see if you won!

#1
Burlap pillow with red pointsettia


#2
tan cotton fabric pillow with red pointsettia


#3
burlap pillow with white pointsettia (not pictured because I've yet to make one of these, but essentially the same as above...just white)


#4
tan cotton fabric pillow with white pointsettia (not pictured because I've yet to make one of these, but essentially the same as above...just white)

Thursday, July 12, 2012

Outdoor Curtains Using Drop Cloths

I am beyond thankful that we have outdoor space at our current apartment. We love being able to grill out in the summer, sip on wine and talk in the evenings, drink coffee and tea in the mornings, and read during the day. I'm actually sitting out on the deck right now as I write this post!

However, we are in the city and so there can be a lack of privacy at times. Sometimes you don't want the neighbor kids next door staring at you while you're trying to read or asking you 10 million times, "What are you doing? Why are you doing that? What are you doing now? Where are you going? Do you like my dress? Wait, what are you doing now?"

Don't get me wrong. I love kids. Clearly I do. I an elementary teacher, I help out with the 3 year old Sunday school class at my church, I used to coach summer league swim team and teach private swim lessons, I was a nanny for a year to 7 adorable kids, and I tutored children. But, when I'm sipping on my coffee in my pjs in the morning, this lady just wants some peace and quiet.

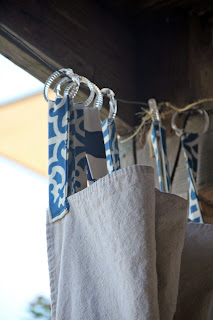
So, to make our back patio a little more private and to help with blocking out the hot sun in the evenings, we hung up some drop cloth curtains. We also used drop cloths as curtains in our family room and sunroom. You can check those out here and here. There were already hooks and wiring to hang the curtains on, so we didn't have to fuss with that (though I think it would have been fairly simple). All I did was sew some tabs onto the drop cloths to make them the right length then used shower curtain rings to hang the curtains on the wire. Using these rings makes it easier to slide the curtains back and forth.


In order to keep these curtains from blowing like crazy during those windy days in the Windy City (which actually isn't called that because of the wind, but because of the politicians of the city who were long-winded when trying and successfully getting the World's Fair of 1893 to be hosted in Chicago. I LOVE Chicago history. Maybe that'll be another post one day.) I used twine that I purchased at Home Depot for $3, tied it around a post, and then tied it around the curtains.


This space really does feel like an additional room of our apartment. We love it!


What do you think of our little backyard oasis?

Here's where I'm sharing my things this week.

Monday, July 9, 2012

Drop Cloth Curtains Revisited

My first post ever on this blog was about the drop cloth curtains that I used in my sunroom. I love the neutral, linen feel that they provide. Plus, at $10 a panel and requiring NO SEWING this was a great alternative to either making my own or purchasing curtains for at least $20 a panel.

This has been a hot Chicago summer. I'm sad to say that I've lost part of my "southernness." I've lost the ability to handle 95+ degree days. A few years ago I always thought that I'd move back to the south, but I just don't know. It's too hot. I think I'd rather deal with the 2 degree days in the winter here than a summer full of 95 degree days. But, ask me how I feel about that in February.

With this crazy hot summer thankfully our apartment stays fairly cool, especially if we close the shades at night to prevent the morning sun from penetrating in. By 11 A.M. the sun is above our apartment so we don't get direct sunlight, but still lots of natural light. Closing those shades makes a huge difference.

I never got around to hanging a curtain for the one big window in our family room that lets in tons of light and, therefore, heat. So it was off to Home Depot to purchase a 6x9 foot drop cloth. I threw it in the wash with a little detergent and fabric softner, stuck it in the dryer, ironed out the wrinkles, then hung it. It's that easy!


Last week when it was 100 degrees out (which I did NOT like), I pulled that baby shut and it kept the front room nice and cool.


Check back in later this week when I share with you our new and improved back patio. We've spruced it up quite a bit from last year and drop cloth curtains are included in that makeover.

What crafts and creative things have you used a drop cloth for?

Here's where I'm sharing my things this week.

Friday, July 6, 2012

Homemade tomato, basil, and goat cheese pizza

Did I tell you how our herbs are growing like crazy? I've been trying out new recipes left and right that require me to use fresh herbs. I used a bunch of our basil the other day to make homemade pesto and froze it to use later. Well, that later happened and the first thing I made was this fabulous tomato and basil pizza with a pesto sauce.

Tomato, Basil, and Goat Cheese Pizza

Ingredients
pizza dough (I used whole wheat pizza dough from Trader Joe's)
2-3 tbsp pesto
1 cup shredded mozzarella
1 plum tomato thinly sliced
8-10 fresh basil  leaves
goat cheese


Directions
Follow the directions on the pizza dough package on how to prep the dough.


On a lightly greased pan or pizza stone, spread out the prepared dough. Spread on the pesto.


Sprinkle on the mozzarella cheese. Add the toppings.
In order to slice the goat cheese without it crumbling, I use dental floss. I promise, it works!


Place in the oven for 12-15 minutes or until mozzarella cheese is melted and golden brown.


We had this beet and goat cheese salad on the side. Yes, I love goat cheese and if you don't like beets just take them out of the recipe.

Enjoy!

Here's where I've shared this tasty recipe this week.


Tuesday, July 3, 2012

Tried It, Liked It Tuesday: Homemade Pesto

I love pesto. It's great on pizza, pasta, paninis...basically anything that starts with a "p." We have so much basil growing, so I looked up on Pinterest how to make your own pesto and freeze it for use later in the year. Oh, and I used my food processor for the first time. WHY did it take me 3 years to use it?! It's amazing! Here's what I did.

Homemade Pesto
Please note that I only had 2 cups of basil although the recipe called for 4 cups. Therefore, I basically divided the recipe in half.

Ingredients:
  • 2 cups fresh, rinsed basil
  • 1/2 cup pine nuts
  • 2 garlic cloves
  • 1/2 cup grated parmesan
  • 1/4  tea­spoon kosher salt
  • 1/4  tea­spoon black pepper
  • 1/2 tea­spoon sugar
  • 1/2 cup extra-virgin olive oil
  • addi­tional olive oil if needed

Directions:
Cut, rinse and dry your fresh basil. Place the basil in the food processor and pulse until basil is lightly chopped. Add in the pine nuts and garlic cloves and continue pulsing. Add in the parmesan, salt, pepper, and sugar. Finally, drizzle in the olive oil pulsing continuously. You still want the pesto to have some texture and not be completely liquidy or a pasty so don't overpulse.

Thanks to the internet and youtube, I learned how to correctly cut basil. Let me tell you, my basil grows like it is on crack. Snip off the stem of the basil where two more stems are growing out. I'm about to cut the basil directly below my fingers in this photo.


I then scooped the pesto into an ice tray to be frozen and used for another time. I'm planning on just popping out a couple of the "pesto cubes" and placing them in a ziploc bag or tupperware container to let them thaw when I'm ready to use them. Oh, and I did a little taste teste before I placed the pesto in the tray and let me just say, YUM!


Does anyone have any good recipes involving pesto? If so, please share!