Tuesday, September 4, 2012

Baked Cauliflour

I've been in need of changing up the veggies in my life lately. Asparagus and broccoli are staple vegetables in our household, but we needed something different, easy, and healthy. Baked cauliflour it is! Enjoy this easy and tasty recipe!


Baked Cauliflour
adapted from Red Chillies
 
Ingredients:
1 tsp chili powder
1/2 tsp tumeric
1 cauliflour, cut into florets
2 tbsp olive oil
 
Directions:
Preheat oven to 400.
 
Toss florets in a medium sized bowl with olive oil. Sprinkle in the chili powder and tumeric.


Place on a cookie sheet lined with tin foil.


Bake for 20-25 minutes.


Easy, right? And so tasty! Enjoy!

Tuesday, August 28, 2012

Tried It Liked It Tuesday: The most amazing brussel sprouts ever!

These are good. Reeeeal good. I'm pretty sure I could eat them every single night. Yes, brussel sprouts. I didn't like this veggie until about a year ago. I just had to figure out how to prepare them and now I love them. Give them a try. Really, I think you'll love them, too!


Roasted Brussel Sprouts
adapted from Cookie + Kate

Ingredients
1 lb brussel sprouts, rinsed, tips cut off, halved
1/3 cup dried cranberries
1/3 cup pecans, chopped and toasted
1/3 cup feta
2 tbsp olive oil
1 tbsp balsamic vinegar
1 tbsp maple syrup


Instructions
 
Preheat your broiler.
 
Set a 12-inch cast iron skillet over medium-high heat on the stove. Let it heat up for about 2-3 minutes.
 
In a medium bowl, toss the prepared brussels sprouts with about 1 tbsp olive oil and salt. Toss well, so that the sprouts are evenly coated in a thin layer of oil.
 
Put the sprouts into the pan and rearrange them so the flat sides are face down. Let them cook for about two minutes.
 
Toss the cranberries into the pan and transfer the pan to your broiler. The pan will be heavy and hot so use oven mitts for both hands (trust me, I burned my fingers when I forgot this little tidbit).
 
Let the brussel sprouts broil for about 3-5  minutes. The tops of the sprouts should be browned and the bottoms carmelized. Remove from oven, again using oven mitts.
 
Toss the brussel sprouts, cranberries, chopped pecans, and feta in a medium sized bowl. Season with salt.


I've made this several times and no two times have been alike. I've used cherries instead of cranberries, walnuts instead of pecans, and no nuts since we were out. I plan on trying this with gorgonzola soon!

Enjoy!

Saturday, August 25, 2012

DIY pallet & wedding gift

I am SO happy with how this project turned out! Here's how it all came about...

A couple of weeks ago I was brainstorming ideas for a wedding gift to give to my friend, Kirby, who was about to get married. I'm not sure how this idea came about in my head, but it started taking form and I had something specific in my mind.

First, I enlisted the help of my father-in-law who has a workshop in the basement of their house (thanks, Joe!). Since Matt and I were heading back to Michigan the following weekend for another wedding, I asked him if he'd be willing to purchase and cut the wood to the size I needed. He loves working in his workshop and I don't blame him! I'd be down there using those tools all the time, too!

By the time we had arrived in Michigan, my FIL had cut the wood so that I could make a 12x12 square pallet. Next, I arranged the pieces of wood in the order that I wanted for each pallet (I made two) taking into account the grain and characteristics of the wood.


Each piece of wood was 12 inches wide and just under 2.5 inches tall. I used 5 pallets to make an almost 12 x 12 inch square.

Using one of the extra pallets that was cut, we lined it up in the center on the backside. I used about 10 nails to hold it all together.


Next, I used part of an old white t-shirt to rub on the stain. I didn't want anything too dark since I was going to be using navy blue paint later. I also wanted it to resemble an actual pallet so I chose fruitwood. I made sure to wear gloves for this portion, especially since I was heading to a wedding shortly. The stain was dry after about 2-3 hours, but it was another 2 days until I did anything else to these pallets.


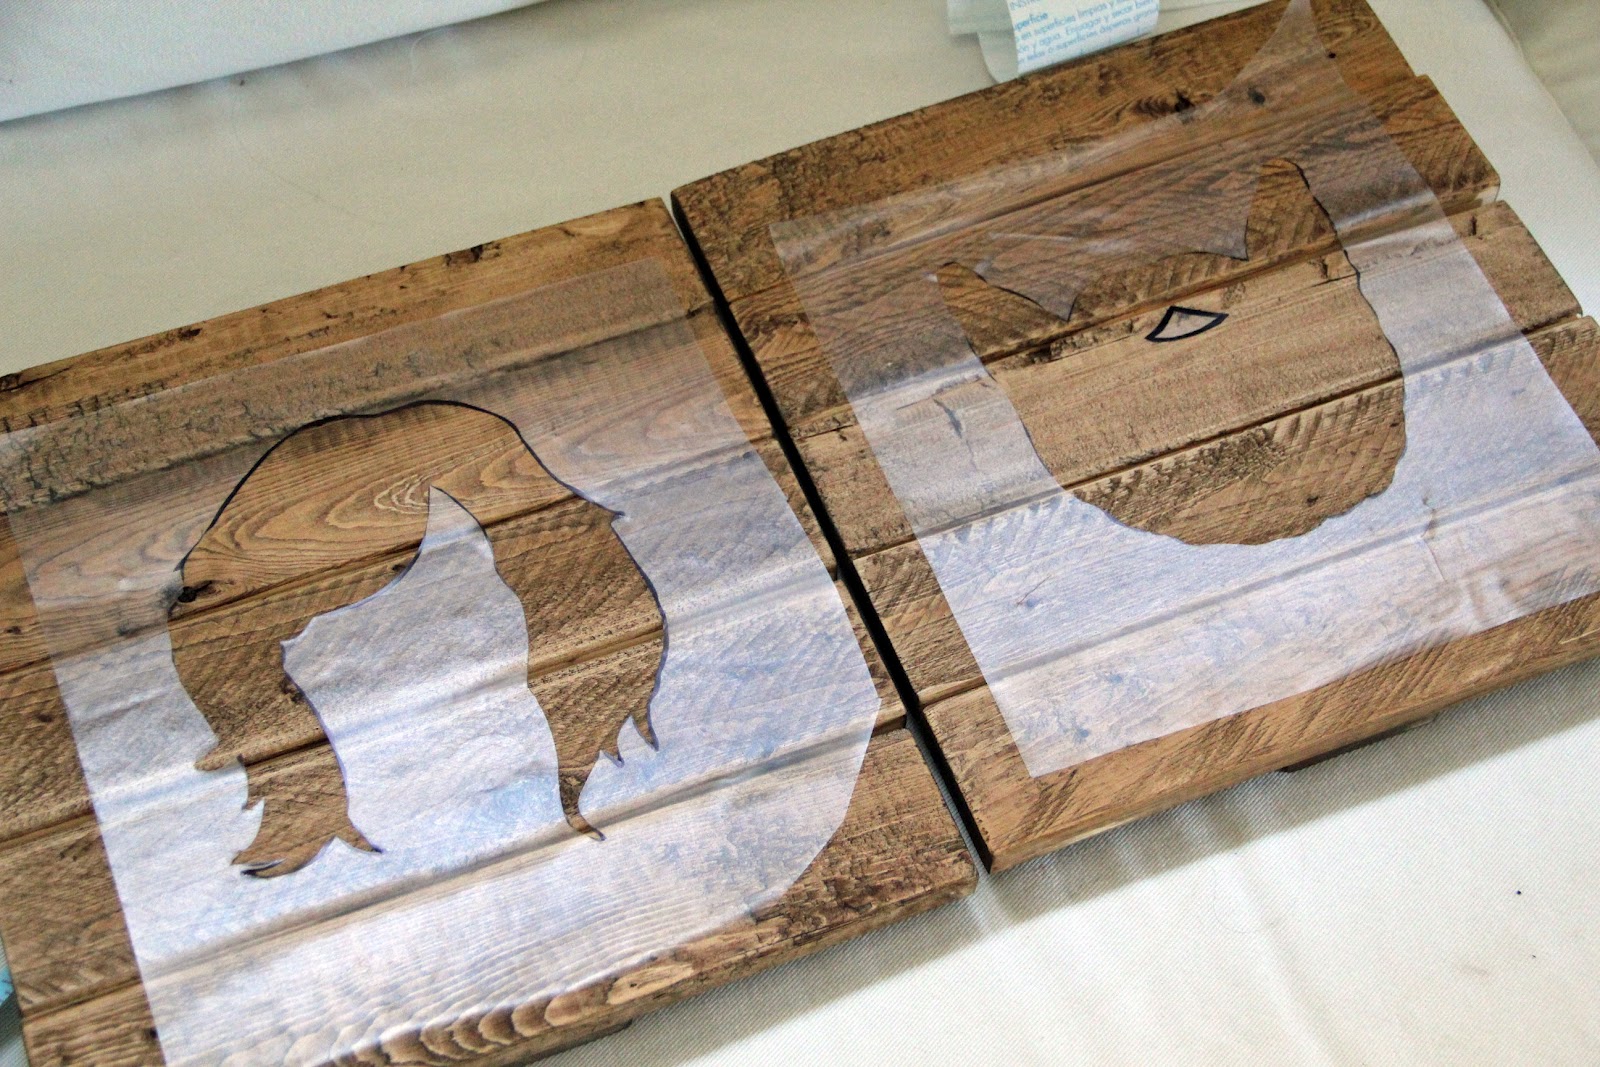
We headed back to Chicago where I finished up the project. I enlarged and printed off the two graphics that I wanted to use - a beard and hair. This was sort of a theme of the wedding. Joshua has a nice, bushy beard and Kirby has beautiful, wild, curly hair. See?


These were the graphics that were on their wedding invite, wedding website, and throughout the wedding reception.
 

I then traced and cut (I used scissors, but an exacto knife would probably be best) out the graphics onto contact paper which is sticky on one side. I placed that sticky side onto the wood, covered the parts I didn't want to be painted with newspaper, and sprayed away. It took me about 3-4 coats to get the coverage I wanted.


It was reeeeally hard to wait patiently for this to dry. I couldn't wait to see what it looked like. Finally, I was able to remove the newspaper and contact paper.


I loved it! But I wasn't finished yet. I nailed a hook to the back so that it can hang on a wall.


Finally, I wanted these two pieces to have a more distressed look so I grabbed some sandpaper and went to town. However, I was careful to only rub the paint area as I did not want to take off much of the stain.

Here is the end result. I LOVE how it turned out and I can't wait to give this to the newleyweds. Hopefully they don't see this before then!


Tuesday, August 21, 2012

Why I've been MIA

Yep, I've been a little MIA lately. I have lots of delicious recipes to share with you soon and a project that I'm currently working on, but for now I will tell you why I've been MIA. My husband and I are adopting! We're very excited about this and it's kept us pretty busy gathering all the paperwork we need. If you'd like to follow along our journey, check out our other blog by clicking here or on the "Our Adoption" tab at the top of our blog.

Tuesday, July 31, 2012

Pizza on a pita

One of the things I love about living in a city is all of the diversity at my fingertips. Not too far from our place there's a bunch of small market stores that sell tons of produce from all over the world. I've never seen some of these fruits and veggies before. It's a cool experience and I've started to get to know several of the workers there. I love when I can make connections in a big city.

Now, I didn't use any of these weird veggies on the recipe I'm about to share with you, but I did find one of the main ingredients I needed at this little store. One of my girlfriends had mentioned to me that she's bought pitas at one of these stores before and used them for pizza crust. Great idea! So I tried out for the first time the other day.

I bought large, thin whole wheat pitas. I think there's about 10 in each packet. When I got home, I looked to see which ingredients I had that would taste good on a pizza. I ended up having a pepper and onion pizza with cheddar cheese on top. Yum!


Pita Pizza 

Ingredients:
2 pitas (just me and the husband)
5-6 tbsp tomato or marinara sauce
1 cup freshly grated cheese (cheddar, mozzarella would work well)
chopped onions
chopped peppers
seasoning to taste (salt, pepper, oregano, italian seasoning...you choose)

Directions:
Preheat oven to 375 degrees. Chop up your veggies. I chose to saute mine for a couple of minutes in olive oil. This is optional.


Next, take your pita bread and place it on a cookie sheet. I put tin foil underneath for easy clean up.


Spread on 2-3 tbsps per pita.


Sprinkle on the cheese, about 1/2 cup per pita. I also had sprinkled on some freshly chopped oregano before I added the cheese. 


Add the toppings.


And bake in the oven for 12-15 minutes or until cheese is melted and golden brown. Take out and let cool for 5 minutes.


I also think this would be great for families where each member gets to his pizza to his liking. I plan on doing this one day! Enjoy!

Click here to visit the other blogs where I'm sharing this tasty recipe!

Thursday, July 19, 2012

Ugly Rug Makeover

Since Matt and I spruced up our patio, I couldn't let this hideous doormat continue to look ugly while everything else was looking so nice. So, I chose a spray paint color I already had, used duct tape (you really can use this stuff for anything!) to make a striped pattern making sure that the paint would cover any stains or spots, and sprayed away.

Yikes.


This took several coats of spray paint. The rug appeared to just be absorbing all the paint, and there were even some spots that just wouldn't completely take in the paint. I was skeptical but when I pulled off the duct tape the end result was much better than I was anticipating.


This little rug still has its flaws, but its much better than before and it was a free makeover!

Wednesday, July 18, 2012

Pointsettia Pillow Giveaway Winner

Thanks to those of you who voted for your favorite pointsettia pillow. I think I know which one I'll be making the most of!

The winner of my little giveaway was Lisa Q. She'll be receiving a burlap pillow with a red pointsettia!


I'll make sure to let you know when these pillows are for sale in my Etsy shop, probably sometime in mid-late October.

Happy Wednesday!