Tuesday, January 31, 2012

Crockpot Chicken Noodle Soup

I've been using my crockpot like crazy lately. Here's another easy and delicious recipe!

CROCKPOT CHICKEN NOODLE SOUP

Original recipe from here. Mine is slightly different since I had to work with what I had in my pantry and my timing.


Ingredients:

1/2 cup chopped celery
1/2 cup carrots
1/2 cup thinly diced onions
5 cups chicken stock or broth
1 can cream of chicken
1 can corn
1.5 cups egg noodles
cooked and chopped chicken
salt and pepper to taste


Directions:

Chop/dice all of the veggies. I did this the night before so I stored them in a container in the fridge overnight.

Add the veggies, chicken broth, cream of chicken, and a little salt and pepper to taste into the crockpot. Stir to mix and cook on low for 5.5 hours.

When you get home from work, add in the egg noodles and cooked and chopped chicken. Cook on high in the crockpot for 1 hour.

Finally, I ladeled this yummy soup into some bowls and enjoyed a warm, homemade meal! Yum!


This made enough for leftovers for my husband and myself. I always like to keep an extra can of chicken broth on hand so that when I reheat the soup, I can add it in. I find that the chicken and noodles can suck in some of the soup making it even more delicious, but leaving you with mostly veggies, chicken, and noodles and not much broth.

Print off the recipe here: Crockpot Chicken Noodle Soup

Linked this recipe to: Somewhat Simple

Crocheting Away

My most recent hobby that I've picked up is crocheting. I used to know how to do it in high school, but then college came along and there were way too many other things to be doing than crocheting. My mother-in-law gave me some supplies to start back up again as my Christmas gift.

I tried to relearn by looking at a book, but it made zero sense to me. I would recommend having someone teach you how to do it which is exactly what I did. My friend came over one afternoon and helped me out. With some patience I was able to pick it up fairly easily. I'll tell you that there have been some frustrating moments, but the final product makes me so proud!


Take a look at the few that I have for sale in my Etsy shop, The Turquoise Pear. And seriously, you can do this, too! Just remember, you need some patience!

Sunday, January 29, 2012

French Toast Casserole

This is my "go-to" recipe for brunch. It's super easy with only a few ingredients and steps, but others will think that you spent hours in the kitchen preparing this dish. Enjoy!


FRENCH TOAST CASSEROLE
serves 5-7

Ingredients

1 stick butter, melted
1 cup heaping brown sugar
1 tsp cinnamon
1 loaf french bread sliced into 3/4" thickness
5 eggs
1 1/3 cup milk
powdered sugar (optional)
syrup (optional)

Directions

Melt the butter in a microwavable dish. Once melted, add in the brown sugar and cinnamon. Pour this mixture into a 9x13 casserole dish and spread out evenly.


Snugly place the sliced french bread into the casserole dish.
Pin It


Beat the eggs and add in the milk. Pour this mixture evenly over the bread.

Sprinkle a little cinnamon on top, cover and place in the fridge for 2-24 hours.

Pin It


When you are ready to bake, preheat the oven to 350 and bake for 20-25 minutes.

Sprinkle powdered sugar on top or don't. Smother it with syrup or don't. You really can't go wrong with this recipe! Oh, and I wish I had a photo of the final project, but it gets gobbled up everytime before I get a chance!


Print off this French Toast Casserole recipe in Word


Linked this recipe to: The Southern Institute Somewhat Simple The Shabby Nest


Wednesday, January 25, 2012

Magnolia Wreath

I love magnolia trees. They just scream "The Deep South" to me. I just picture them sitting along red, dusty roads out in the country with people sitting on their front porches in the humid weather. I'm missing the south right about now!

The last time that I was back in the south visiting my parents and sister, I went to the backyard and cut off some magnolia leaves with a project in mind. I wrapped them in a big white trash bag and stuck them in my carry-on.

When I got back to Chicago, I cut out a circle with a circumference of about 12 inches out of cardboard. I then cut a hole in the middle, leaving the circle about 2-3 inches thick. This is where I glued the leaves with a hot glue gun.

First, I glued the leaves around the outermost part of the circle. Next, I glued around the inner part of the cirle, covering up any large portions of cardboard. I wanted more volume to my wreath, so I just randomly placed extra leaves in areas that I felt like it. I also glued some leaves on where the back of the leaf would show which gave it some texture.

I didn't like how the leaves' stems were poking out around the middle, so I added just a little bit of moss around the center circle to better camoflauge these stems. I'm super happy with the outcome and it a little touch of the South in my northern home!

Pin It


What do you think? Sorry I don't have more step-by-step photos. I'm going to get better at that!

Linked to: Someday Crafts, Southern Lovely

Linked up to: The Shabby Creek Cottage
The Shabby Nest The Southern Institute

Friday, January 20, 2012

Bite Sized Stuffed Tomatoes

My sweet friend, Tamara, introduced me to these delicious stuffed tomatoes. She's made them for Christmas parties and baby showers. Once you have one, you will have to have another and another and another. You get the picture.

BITE SIZED STUFFED TOMATOES


Ingredients:

approximately 20 cherry tomatoes
1 lb bacon, cooked and crispy, broken into tiny bits
1/3 cup chopped green onion
1/3 cup parmesan cheese, grated (I used the kind in the plastic shaker since that's what I had) a little over
1/3 cup mayo (the recipe called for 1/2 but it seemed like too much)
Directions:
Rinse the tomatoes.

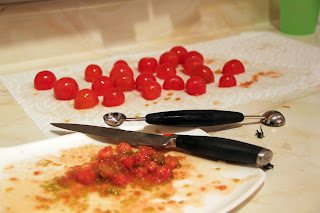
Cut off the bottom stem of each tomato. Scoop out the insides (I used a melon ball scooper for this). Place the tomatoes upside down on a paper towel or plate so that they can dry out.

In a small bowl, mix together the bits of bacon, chopped green onion, parmesan, and mayo.

Scoop the mixture into the tomatoes. Refrigerate and enjoy later.

Pin It


Print off the recipe here.

Linked to: The Shabby Creek Cottage, Somewhat SimpleUndertheTableandDreamingThe Southern Institute

Wednesday, January 11, 2012

Drop Cloth Curtains

A while back as I was preparing for one of my painting projects, I had bought a drop cloth from Home Depot. As I opened it up, I noticed what I nice color it was. Then an idea popped into my head...drop cloth curtains! I did a little research online and lo and behold other people have had this idea too. I got excited and so did my husband so off we went to Home Depot to purchase 6 drop cloths and some rods to hang them with.


Pin It


Matt worked to get the rods hung up while I did about 6 loads of laundry with the drop cloths and tons of fabric softner (I did 2 at time each load with a full lid of fabric softner), then dried, then ironed them. Finally, I clipped the rings onto the drop cloths, put them on the rod, and voila! Amazing! No sewing involved, a cheap solution to expensive drapes ($10 for a 6x9 drop cloth), and really makes a difference in the room!

Pin It


Linking up to: Skip to My Lou, Today's Creative Blog, Under the Table and Dreaming